Greening your Landscape - Composting
Compost is decomposing organic matter that can be used to improve your soil. It can easily be made from common food and yard wastes and can significantly reduce the amount of trash sent to landfills. While food and yard waste is biodegradable, landfills are designed to prevent air and water movement- two
crucial elements needed for decomposition. So, instead of sending these
materials to sit in landfills, you can use them to “green” your landscape in
more ways than one!
Benefits of Composting
-
Reduces waste going to landfills
-
Cheaper than bagging wastes
-
Enriches soils
-
Binds to contaminants
-
Reduces the need for water and fertilizers
-
Suppresses plant diseases
Choosing the Bin for You
The first step to composting is choosing a bin. Compost bins come in all shapes and sizes. The right bin for you depends on the amount of time you want to spend, the space you have and your budget. Simple bins can be constructed easily and at a cheap cost, however, many of these bins require more work that the
complex types.
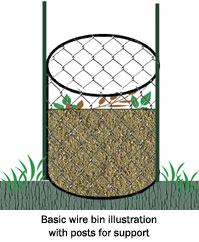
Basic Wire Bins are some of the simplest compost bins to make and use. To make one of these bins, take an 11 foot by 3 foot piece of welded fence or chicken wire. Tie the ends together with cable ties to form a large cylinder. Use galvanized fence posts to support the bin. Wooden stakes are not good for
support as they can quickly rot in a compost bin. This type of bin can hold up
to 1 cubic yard of material and will require you to use a pitch fork to turn the
contents at least once a week.
Barrel Composters are also easy to make and simple to use. Take a 55 gallon barrel and drill 6-9 rows of ½ inch holes around the barrel to allow oxygen to penetrate the inside. Fill the barrel up to ¾ full and let it sit to compost. Once a week, you can roll the barrel on its side to mix contents, but be careful not to spill everything!
Enclosed Plastic Bins are a cheap compost bin that can be purchased at most garden retail stores. The advantages to these bins are that they usually require little space, they keep critters out and they allow for continuous composting instead of batch composting. The disadvantage to these bins is that composting can take up to two years due to the lack of turning contents.
Tumbling or Rotating Bins are more expensive than simple enclosed plastic bins, but they easily allow people to turn and aerate the contents by using a crank or handle. One drawback to rotating bins is that they usually are much smaller than bins you can build on your own. In addition, once they are full, you have to wait for the compost to complete. The good news is that their design allows for quick compost turnaround times.
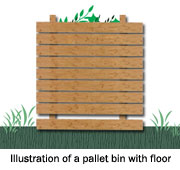
Wood Pallet Bins are a great way to recycle. You can take four old wooden pallets from stores or factories and attach them together with wire, rot-resistant rope or chain to form a box. If you can acquire a fifth pallet,
then use it as a floor to help increase air flow into your bin. Wood pallet bins
can easily be expanded to multiple bin units, and they often hold a little over
a cubic yard of compost. One disadvantage to these bins is that they will rot
over time. However, you can extend the life of the bin by including a floor.
Recipe for “Black-Gold”
Once you have chosen the right bin for you, the nest step is to create your compost.
To make compost, you need organic materials, microorganisms, water and oxygen in the right proportions. In terms of organic material, it is important to maintain a carbon to nitrogen ratio of approximately 30:1. Another golden rule is to remember that the smaller the items, the faster they will decompose. So, if you want to speed up the composting process then shred large material. Certain
materials like branches will have to be shredded anyways.
The best compost is made all at once, so collect your materials in advance.
For fruit and vegetable scraps, store them in an air tight bin with saw dust until you are ready to compost. Find a shady spot in your yard to place the bin and then add the ingredients. Be sure that you don’t place the bin too close to trees, though, as the roots will likely find their way into your bin. It is best to start with a 6 inch layer of carbon-rich materials (aka “brown stuff”) and then add a 2-3 inch layer of nitrogen-rich materials (“green stuff”).
The table below details which materials are more carbon or nitrogen rich. As you add your layers, moisten the pile to make it damp but not sopping wet. Typically, you want 50-55% of your pile to be moist.
Alternate layers until your bin is full and then allow it to sit for a week. Bone meal and manure can be used as “activators” between your compost layers in order to speed up the process. Smaller items in the pile also decompose quicker, so if you shred or mulch material before it goes into the compost, then the beneficial bacteria can decompose it faster.
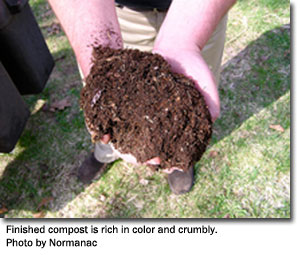
Turn or tumble the pile, and repeat this step every week
until the compost is crumbly and a rich black or brown in color.
One way to check on your compost as it decomposes is to use a portable thermometer.
Ideally, the compost should be 130-150 degrees Fahrenheit in the middle of the
pile if it is actively decomposing.
When the compost is complete, mix it into your garden or potting soil. Compost
can also be used as mulch. If you notice that all of your compost is not
completely done, then return the unfinished compost back in the bin for the next
round of composting.
Common Compost Ingredients
Ingredient
|
Carbon/Nitrogen
|
Details
|
|
Cardboard |
Carbon |
Best when shredded |
|
Chicken manure |
Nitrogen |
Good at activating compost |
|
Coffee grounds |
Nitrogen |
Can include coffee filters too |
|
Corn cobs, stalks |
Carbon |
Slow decomposers, so shred first |
|
Eggshells |
Neutral |
Only use shells and best when crushed |
|
Flowers & cuttings |
Nitrogen |
Shred any woody stems |
|
Fruit & vegetable scraps |
Nitrogen |
Best added with dry carbon items to deter
fruit flies; also good to bury under other materials to
deter rodents |
|
Garden plants |
-- |
Don’t add diseased plants |
|
Grass clippings, lawn and garden weeds |
Nitrogen |
Add in thin layers and avoid weeds with
seeds |
|
Leaves |
Carbon |
Best when shredded |
|
Newspaper, shredded paper |
Carbon |
Glossy paper and those with colored inks
are not good for compost |
|
Pine needles |
Carbon |
Use sparingly due to acidity |
|
Sawdust pellets |
Carbon |
High in carbon but should be spread
thinly to prevent clumps |
|
Shrub clippings |
Carbon |
Shred woody branches |
|
Straw or hay |
Carbon |
Straw more favorable than hay |
|
Tea leaves |
Nitrogen |
Can add with bags or loose |
|
Wood ash |
Carbon |
Only use thin layer |
|
Wood chips / pellets |
Carbon |
Only use thin layer due to high carbon
content |
Unsuitable Items for Composting
While many items are suitable for composting, some items attract unwanted pests
(like raccoons) and encourage the growth of bad bacteria. In addition,
herbicide-treated plants can leach herbicides into your compost. To avoid these
problems, avoid using the items listed below.
-
Meat, bones, grease, animal fats and dairy products
-
Whole eggs
-
Diseased plants
-
Herbicide treated plants
-
Walnut, pecan and almond shells
Troubleshooting Tips
When composting, you may run into a few problems. The list below details some of
the most common compost issues and how to solve them.
Problem: Stinky compost
- Cause: Not enough oxygen, too much nitrogen and/or wrong items added to bin
- Solution: Turn pile to aerate, add dry items high in carbon content, add lime
and/or be sure not to use unsuitable compost items listed above
Problem: Pile not heating up
- Cause: Pile is too small, requires more moisture, requires more air and/or
needs more nitrogen.
- Solution: Add contents to pile if it is not large enough. In addition, add a
little bit of water to dampen pile, turn pile and add nitrogen. If you are
lacking nitrogen materials, then a sprinkling some 10-10-10 fertilizer in the
compost will work.
Problem: Compost only warm and damp in center
- Cause: Pile is too small
- Solution: Add more material
Problem: Flies, earwigs, slugs and/or other insects; white substance
throughout compost
- Cause: Proper composting!
- Solution: Pat yourself on the back: composting is working!
Invite Wildlife to Your Backyard!
For Additional Information, Contact:
Sarah B. Witcher
410-260-8566
sarah.witcher1@maryland.gov
Department of Natural Resources
Wildlife and Heritage Service
580 Taylor Avenue, E-1
Annapolis, Maryland 21401
